When it comes to the world of Internet of Things (IoT), Raspberry Pi has emerged as a versatile and powerful tool for developers and hobbyists alike. If you're looking to set up a secure and efficient IoT system using Raspberry Pi, understanding SSH (Secure Shell) is essential. This tutorial will walk you through the process step by step, ensuring you can remotely manage your Raspberry Pi with confidence.
Raspberry Pi IoT SSH tutorial is designed for both beginners and advanced users who want to leverage the capabilities of this single-board computer in their IoT projects. Whether you're building a smart home system or monitoring environmental data, mastering SSH will enhance your project's functionality and security.
In this guide, you'll learn how to configure SSH on your Raspberry Pi, connect remotely, troubleshoot common issues, and implement best practices to safeguard your IoT setup. By the end of this tutorial, you'll be equipped with the knowledge to manage your Raspberry Pi seamlessly, even from remote locations.
Table of Contents
- Introduction to SSH
- Raspberry Pi Overview
- Step-by-Step SSH Setup
- Connecting Remotely
- Configuring SSH Settings
- Best Practices for SSH
- Troubleshooting SSH Issues
- Securing Your IoT Setup
- Advanced Features of SSH
- Conclusion
Introduction to SSH
SSH, or Secure Shell, is a network protocol that allows you to securely connect to and manage remote devices. It encrypts all data transmitted between your local machine and the remote device, ensuring secure communication. This is particularly important when working with IoT devices, where security is paramount.
Why Use SSH for IoT?
Using SSH for IoT projects offers several advantages:
- Security: SSH encrypts data, preventing unauthorized access.
- Remote Access: You can manage your Raspberry Pi from anywhere in the world.
- Automation: SSH can be integrated into scripts for automating tasks.
Understanding SSH basics will help you unlock the full potential of your Raspberry Pi IoT projects.
Raspberry Pi Overview
Raspberry Pi is a small, affordable computer that has revolutionized the way we approach technology projects. With its compact size and robust performance, it's ideal for IoT applications. Whether you're a beginner or an experienced developer, Raspberry Pi provides endless possibilities for innovation.
Key Features of Raspberry Pi
- Compact Design: Fits easily into any project setup.
- Cost-Effective: Affordable pricing makes it accessible to everyone.
- Versatile: Compatible with various operating systems and programming languages.
Before diving into the Raspberry Pi IoT SSH tutorial, ensure your Raspberry Pi is properly set up with the latest operating system.
Step-by-Step SSH Setup
Setting up SSH on your Raspberry Pi is straightforward. Follow these steps to enable SSH and configure your device for remote access.
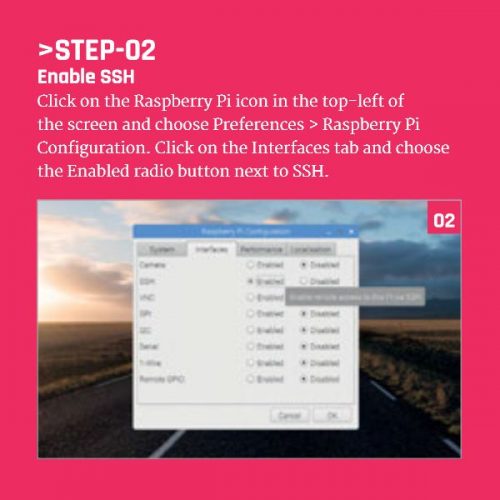
Enabling SSH on Raspberry Pi
To enable SSH on your Raspberry Pi, follow these instructions:
- Connect your Raspberry Pi to a monitor, keyboard, and mouse.
- Boot your Raspberry Pi and log in to the operating system.
- Open the terminal and type the following command:
sudo raspi-config. - Select "Interfacing Options" and navigate to "SSH".
- Choose "Enable" and confirm your selection.
Once SSH is enabled, your Raspberry Pi is ready for remote connections.
Connecting Remotely
Connecting to your Raspberry Pi remotely is simple with SSH. All you need is the IP address of your device and an SSH client on your local machine.
Steps to Connect via SSH
- Find the IP address of your Raspberry Pi by running
ifconfigorip addrin the terminal. - Install an SSH client on your local machine (e.g., PuTTY for Windows or Terminal for macOS/Linux).
- Use the following command to connect:
ssh pi@. - Enter the password when prompted and you're in!
This connection allows you to manage your Raspberry Pi remotely, making it ideal for IoT projects.
Configuring SSH Settings
Customizing SSH settings can enhance both security and usability. Here's how to adjust key parameters:
Editing SSH Configuration
To edit SSH settings, follow these steps:
- Open the SSH configuration file:
sudo nano /etc/ssh/sshd_config. - Modify parameters such as port number, password authentication, and root login.
- Save the file and restart the SSH service:
sudo systemctl restart ssh.
Configuring SSH settings ensures your Raspberry Pi IoT setup is tailored to your needs.
Best Practices for SSH
Implementing best practices for SSH is crucial for maintaining a secure and efficient IoT environment.
Top Tips for Secure SSH Usage
- Change Default Port: Avoid using the default port 22 to deter automated attacks.
- Use Key-Based Authentication: Disable password authentication and use SSH keys for added security.
- Regular Updates: Keep your Raspberry Pi's operating system and SSH software up to date.
By adhering to these best practices, you can protect your IoT projects from potential threats.
Troubleshooting SSH Issues
Encountering issues with SSH is common, but most problems can be resolved with the right approach.
Common SSH Problems and Solutions
- Connection Refused: Check the IP address and ensure SSH is enabled.
- Authentication Failure: Verify the username and password or SSH key.
- Timeout Errors: Ensure there are no network issues or firewall restrictions.
Addressing these issues promptly will ensure smooth operation of your Raspberry Pi IoT setup.
Securing Your IoT Setup
Security is a top priority when working with IoT devices. Here's how to fortify your Raspberry Pi IoT system:
Steps to Enhance IoT Security
- Implement a strong firewall to restrict unauthorized access.
- Regularly monitor logs for suspicious activity.
- Use encryption for sensitive data transmission.
Securing your IoT setup not only protects your data but also ensures the reliability of your projects.
Advanced Features of SSH
Beyond basic functionality, SSH offers advanced features that can elevate your Raspberry Pi IoT projects.
Exploring Advanced SSH Capabilities
- Tunneling: Use SSH tunnels to securely access services on your Raspberry Pi.
- Port Forwarding: Redirect traffic from one port to another for added flexibility.
- Automation Scripts: Integrate SSH into scripts for automating repetitive tasks.
These advanced features unlock new possibilities for your IoT projects, enhancing both functionality and efficiency.
Conclusion
This Raspberry Pi IoT SSH tutorial has provided a comprehensive guide to setting up, configuring, and securing your Raspberry Pi for remote access. By following the steps outlined, you can confidently manage your IoT projects from anywhere in the world.
Remember to implement best practices for SSH and regularly update your system to protect against potential threats. If you found this tutorial helpful, consider sharing it with others or leaving a comment below. For more insights into Raspberry Pi and IoT, explore our other articles on the site.
Happy tinkering and secure connecting!