Securing your Raspberry Pi VNC setup is essential to protect your device from unauthorized access and potential cyber threats. As more users adopt Raspberry Pi for various applications, ensuring its security becomes paramount. This guide will walk you through the steps to configure your VNC server securely using the host.allow file, offering practical tips and expert advice.
In today's digital age, where remote access to devices is increasingly common, securing your Raspberry Pi VNC setup is not just a recommendation but a necessity. Whether you're using Raspberry Pi for home automation, media centers, or as a development platform, leaving it vulnerable can lead to serious consequences. Understanding how to secure your VNC host with host.allow is the first step toward safeguarding your device.
This article aims to provide a comprehensive overview of securing your Raspberry Pi VNC host, including configuring the host.allow file, implementing best practices, and addressing potential vulnerabilities. Whether you're a beginner or an advanced user, this guide will equip you with the knowledge to enhance your Raspberry Pi's security effectively.
Below is the detailed table of contents for easy navigation:
Table of Contents
- Introduction to Raspberry Pi VNC Security
- Understanding Raspberry Pi and VNC Basics
- What is host.allow and Its Role in VNC Security?
- Configuring VNC Server on Raspberry Pi
- Securing Your VNC Host with host.allow
- Additional Security Measures for Raspberry Pi
- Troubleshooting Common Issues
- Best Practices for Raspberry Pi Security
- Frequently Asked Questions
- Conclusion and Next Steps
Introduction to Raspberry Pi VNC Security
Importance of Securing Raspberry Pi
Securing your Raspberry Pi is vital, especially when it is connected to the internet. A compromised Raspberry Pi can serve as an entry point for attackers to access your network or steal sensitive data. VNC (Virtual Network Computing) is a popular tool for remotely accessing Raspberry Pi, but without proper security measures, it can expose your device to various threats.
Common Threats to Raspberry Pi VNC
Some common threats to Raspberry Pi VNC setups include brute force attacks, unauthorized access, and malware infections. These threats can be mitigated by implementing robust security measures, such as configuring the host.allow file and using strong passwords.
Why Use host.allow for VNC Security?
The host.allow file plays a crucial role in controlling access to your Raspberry Pi VNC server. By specifying which IP addresses or hosts are allowed to connect, you can significantly reduce the risk of unauthorized access. This file acts as a whitelist, ensuring that only trusted devices can interact with your VNC server.
Understanding Raspberry Pi and VNC Basics
What is Raspberry Pi?
Raspberry Pi is a series of small single-board computers developed by the Raspberry Pi Foundation. These devices are widely used for educational purposes, home automation, media centers, and various other applications. Their affordability and versatility make them popular among hobbyists and professionals alike.
What is VNC?
VNC is a graphical desktop sharing system that allows you to remotely control another computer. It transmits keyboard and mouse input from one computer to another, enabling users to interact with the remote device as if they were sitting in front of it. VNC is particularly useful for managing Raspberry Pi devices remotely.
Basic Components of VNC Setup
- VNC Server: The software running on the Raspberry Pi that allows remote access.
- VNC Viewer: The client application used to connect to the VNC server from another device.
- Network Configuration: Proper setup of IP addresses and network settings to enable communication between devices.
What is host.allow and Its Role in VNC Security?
Overview of host.allow File
The host.allow file is part of the TCP Wrappers system, which provides host-based access control to network services on Unix-like operating systems, including Raspberry Pi. By editing this file, you can specify which hosts are allowed to access specific services, such as the VNC server.
How host.allow Works
When a connection request is made to a service protected by TCP Wrappers, the system checks the host.allow file to determine whether the requesting host is permitted access. If the host is listed in the file, the connection is allowed; otherwise, it is denied.
Benefits of Using host.allow
- Enhanced security by restricting access to trusted hosts.
- Reduced risk of brute force attacks and unauthorized access.
- Improved control over network traffic and resource usage.
Configuring VNC Server on Raspberry Pi
Installing VNC Server
To install VNC Server on your Raspberry Pi, follow these steps:
- Update your Raspberry Pi's package list:
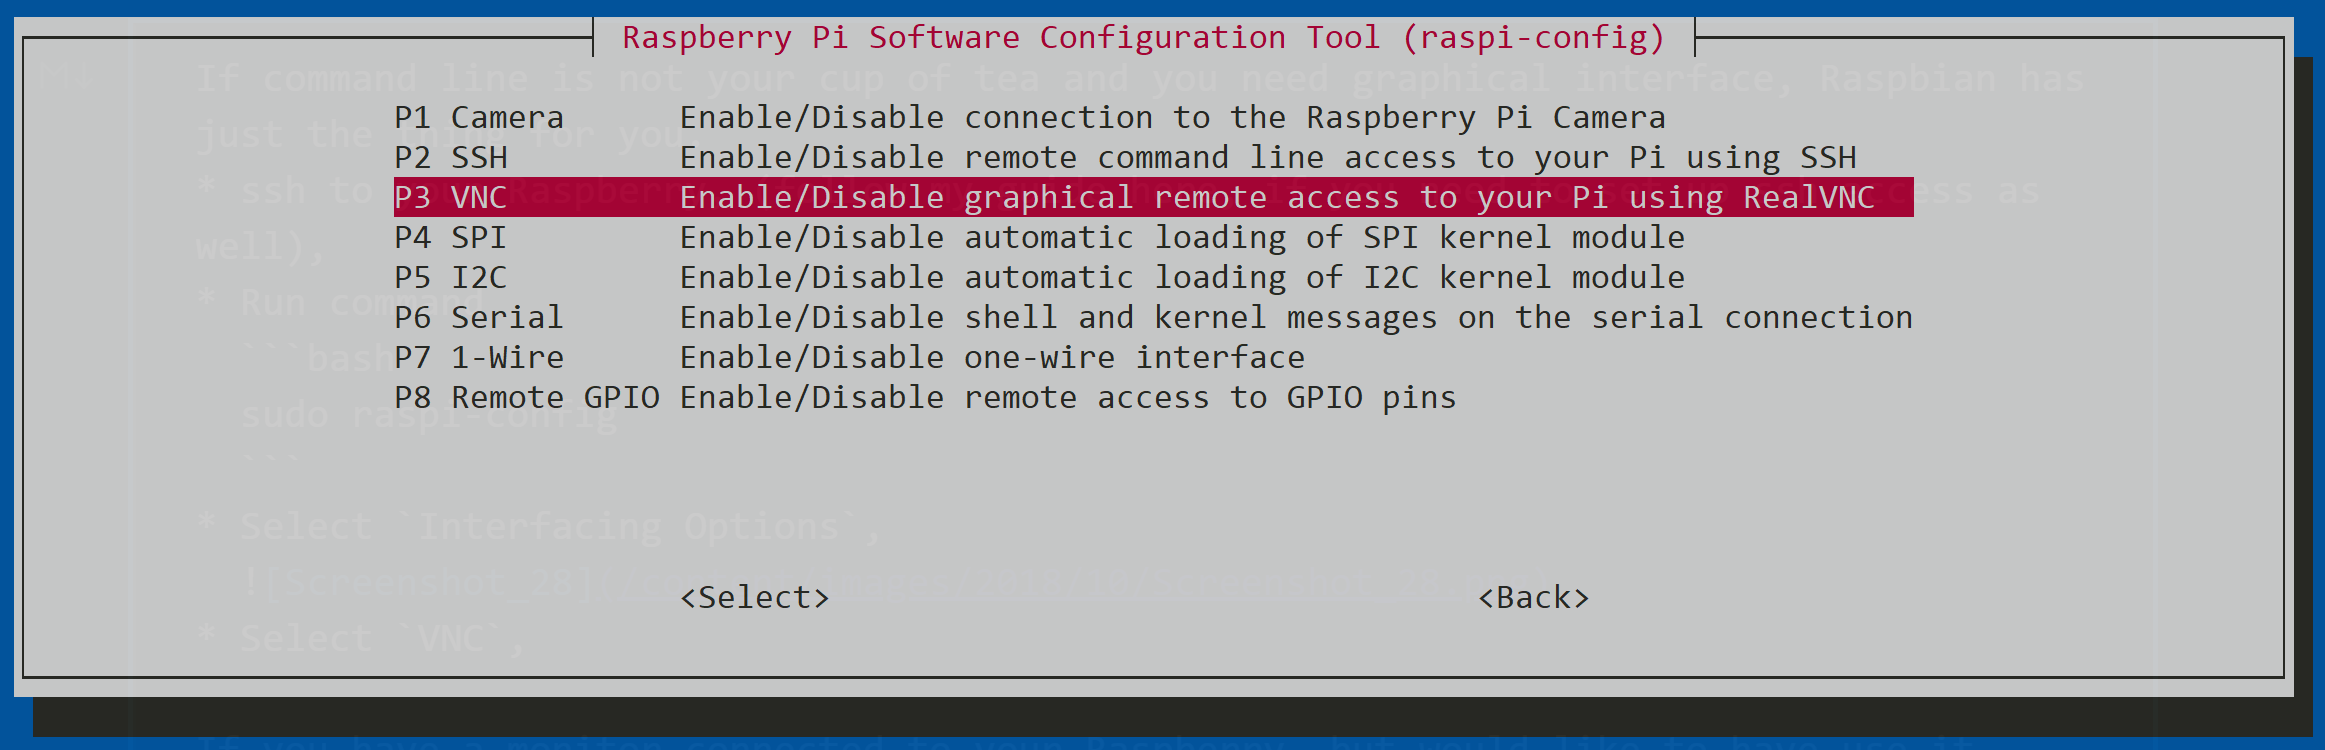
sudo apt update - Install RealVNC Server:
sudo apt install realvnc-vnc-server - Enable VNC Server in the Raspberry Pi Configuration menu.
Configuring VNC Settings
After installation, configure VNC settings to suit your needs. You can set up a password for VNC access and choose the display resolution and quality settings. Ensure that you use a strong, unique password to enhance security.
Testing VNC Connection
Once configured, test your VNC connection using a VNC Viewer application. Connect to your Raspberry Pi's IP address and verify that the connection is successful. This step is crucial to ensure that everything is set up correctly before proceeding to secure the setup.
Securing Your VNC Host with host.allow
Editing the host.allow File
To secure your VNC host, edit the host.allow file using a text editor like nano:
- Open the file:
sudo nano /etc/hosts.allow - Add the following line to allow specific hosts:
vncserver: 192.168.1.100 - Save and exit the file.
Restricting Access to Trusted Hosts
By specifying trusted hosts in the host.allow file, you can ensure that only authorized devices can access your VNC server. This approach minimizes the risk of unauthorized access and enhances overall security.
Monitoring Access Attempts
Regularly monitor access attempts to your VNC server by checking the system logs. Look for any suspicious activity or repeated failed login attempts, which could indicate a potential security threat.
Additional Security Measures for Raspberry Pi
Using Strong Passwords
Employing strong, unique passwords is one of the simplest yet most effective ways to secure your Raspberry Pi. Avoid using common passwords and consider enabling two-factor authentication for added security.
Enabling Firewall
Enable the UFW (Uncomplicated Firewall) on your Raspberry Pi to control incoming and outgoing network traffic. Configure the firewall to only allow necessary ports and services, further enhancing security.
Keeping Software Updated
Regularly update your Raspberry Pi's operating system and installed software to protect against known vulnerabilities. Use the following commands to update your system:
sudo apt updatesudo apt upgrade
Troubleshooting Common Issues
Connection Problems
If you encounter connection issues, verify that the VNC server is running and that the IP address and port number are correct. Check the host.allow file to ensure that your device is listed as a trusted host.
Authentication Errors
Authentication errors can occur due to incorrect passwords or misconfigured settings. Double-check your VNC password and ensure that it matches the one set on the Raspberry Pi.
Network Configuration Issues
Ensure that your Raspberry Pi and the connecting device are on the same network and that there are no firewall or router settings blocking the connection.
Best Practices for Raspberry Pi Security
Regular Backups
Perform regular backups of your Raspberry Pi to prevent data loss in case of a security breach or hardware failure. Use tools like rsync or Clonezilla for efficient backups.
Limiting User Permissions
Restrict user permissions to only what is necessary for their tasks. Avoid using the root account for everyday operations and create separate user accounts with limited privileges.
Monitoring System Logs
Regularly review system logs to identify and address any security issues promptly. Use tools like Logwatch or Splunk to simplify log analysis and monitoring.
Frequently Asked Questions
What is the Purpose of host.allow?
The host.allow file is used to specify which hosts are allowed to access network services on your Raspberry Pi, enhancing security by restricting access to trusted devices.
Can I Use host.deny Instead of host.allow?
Yes, the host.deny file can be used to deny access to specific hosts. However, using host.allow is generally recommended for a whitelist-based approach to security.
How Often Should I Update My Raspberry Pi?
It's advisable to update your Raspberry Pi regularly, ideally once a week, to ensure that you have the latest security patches and software improvements.
Conclusion and Next Steps
Securing your Raspberry Pi VNC setup is crucial to protect your device and data from potential threats. By configuring the host.allow file and implementing additional security measures, you can significantly enhance the security of your Raspberry Pi. Remember to use strong passwords, enable firewalls, and keep your software updated to maintain a secure environment.
We encourage you to share this article with others who might benefit from it and leave your thoughts or questions in the comments section below. For more in-depth guides and tutorials on Raspberry Pi and other tech topics, explore our website further.